Crochet Pig Pattern
Free amigurumi pig pattern that you can personalize.
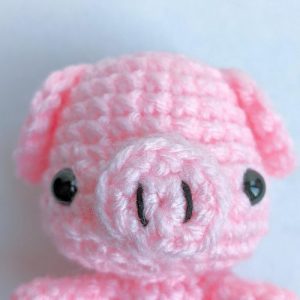
How can you say no to this amigurumi pig’s cute snout? If you happen to have some pink yarn that you don’t know what to do with, you can crochet yourself this adorable crochet pig pattern for free. All of the pieces in this pig crochet design are worked in the round so you’ll get lots of practice with the magic circle. The pig amigurumi has also has a little curly tail that is made from a simple slip stitch chain.
See the free crochet stuffed pig pattern below or customize your own pig amigurumi free pattern with the Amigurumio builder. You can swap out any of the pieces and change their colours. Then you can download the PDF of your personalized crochet pig pattern.

How to Crochet a Pig
The head, body, limbs, and ears of the amigurumi pig are worked in the round, which means that you begin with a magic circle and then crochet in a spiral to build out a spherical shape. Once the pieces are crocheted and stuffed, they are sewn together using a yarn needle to put together the pig crochet. For the nostrils on the snout of the amigurumi pig, you will need only a small length of black yarn to embroider two small, vertical lines.

Amigurumi Pig Pattern Tips
One of the trickiest techniques when beginning to crochet your first amigurumi is the magic ring/circle. This is the start of each piece in of pig amigurumi free pattern and it creates a circular base that you work around to form the head, body and other pieces.
There are several ways to make a magic ring/circle. If it’s your first time making the magic ring, don’t worry if it takes a bit of practice to get right. But once you get it, you have now gotten over one of the toughest hurdles in crocheting! And then start crocheting your own pig crochet animal!
Pig Amigurumi Pattern
When making the amigurumi pig, you will stuff each piece with polyfill. If you want to avoid the stuffing showing through the pig crochet, the stitches on your pieces should be tight and close together. This is accomplished by using the right hook size with the yarn that you’re using.
For my amigurumi pig pattern, I used medium/worsted weight yarn. You’ll know if the yarn is the right weight by looking at the label for the “4” symbol. For the hook size, I recommend starting with a 4.0 mm hook. If you find that your stitches are too loose, try switching to a 3.5 mm hook. If your stitches are too tight, you can try a 4.5 mm hook. When your crocheting experience grows after a few pig crochet projects, you’ll find what works best for you.
See below for how to crochet a pig!
Materials and Yarn for Amigurumi Pig Pattern
Yarn Color
- Pink (P)
- Black (B)

Materials
- Medium/worsted weight yarn
- 4.0 mm hook
- Scissors, yarn needle
- Stitch marker
- Polyester fibrefill
- Two 8.0 mm safety eyes
Head
Use pink (P) yarn. In R8, place a marker in the middle of the round (you can use a strand of yarn) to help determine where the safety eyes will be inserted.
R1: With P, sc 6 in magic ring (6)
R2: inc in each st around (12)
R3: (sc 1, inc) six times (18)
R4: (sc 2, inc) six times (24)
R5-7: sc in each st around (24)
R8: (sc 3, inc) three times, place marker, (sc 3, inc) three times (30)
R9-10: sc in each st around (30)
R11: (sc 3, dec) six times (24)
R12: (sc 2, dec) six times (18)
R13: (sc 1, dec) six times (12)
Insert safety eyes below R9, and three stitches on each side of the marker.
R14: dec six times (6)
Finish with a sl st into the next stitch. Cut a short yarn tail for sewing. Stuff the head and sew the opening closed.
Snout
Use pink (P) and black (B) yarn.
R1: With P, sc 6 in magic ring (6)
R2: (inc, inc, sc 1) two times (10)
R3: In the back loops only, sc in each st around (10)
Finish with a sl st into the next stitch. Cut a long yarn tail for sewing.
Cut a 8 cm strand of black yarn and embroider two vertical lines for the nostrils.
Ear (Make 2)
Use pink (P) yarn.
R1: With P, sc 6 in magic ring (6)
R2: inc in each st around (12)
R3: (sc 2, inc) two times, (inc, sc 2) two times (16)
Finish with a sl st into the next stitch. Cut a long yarn tail for sewing.
Body
Use pink (P) yarn.
R1: With P, sc 6 in magic ring (6)
R2: inc in each st around (12)
R3: (sc 1, inc) six times (18)
R4: (sc 8, inc) two times (20)
R5-6: sc in each st around (20)
R7: (sc 3, dec) four times (16)
R8: sc in each st around (16)
R9: (sc 2, dec) four times (12)
Finish with a sl st into the next stitch. Cut a long yarn tail for sewing. Stuff the body and sew the body to the head.
Arm (Make 2)
Use pink (P) yarn.
R1: With P, sc 6 in magic ring (6)
R2: (sc 2, inc) two times (8)
R3: sc in each st around (8)
R4: sc 6, dec (7)
R5: sc 5, dec (6)
Finish with a sl st into the next stitch. Cut a long yarn tail for sewing. Stuff the arm and sew the arm to the body.
Leg (Make 2)
Use pink (P) yarn.
R1: sc 6 in magic ring (6)
R2: inc in each st around (10)
R3: sc in each st around (10)
R4: sc 3, dec, dec, sc 3 (8)
R5: sc in each st around (8)
Finish with a sl st into the next stitch. Cut a long yarn tail for sewing. Stuff the foot and sew the foot to the body.
Tail
Use pink (P) yarn.
With P, chain 7.
Skip the first ch from the hook, sl st 6.
Fasten off and cut a long yarn tail for sewing. Sew the tail to the body.


Not enough time to design your own pattern?
Download a premium amigurumi pattern for free.
You can unsubscribe at any time from receiving free crochet patterns. See our privacy policy.
0 Comments